Preprocessing
Remember our drink menu? It is a little difference for what we should do in FSL but overall there are very similar. Anyway, let’s have a couple of drinks before the meal:
1 Inspecting the data
2 Skull stripping
3 Motion correction
4 Slice-Timing Correction
5 Smoothing
6 coregistration and Normalization
Inspecting the image
Before we are actually running the analysis, it is safe for us to check the data for any problems such as scanner spikes, incorrect orientation, or poor contrast, and so on. Although it might be unnecessary for the open neuroimaging data, it is really important for you to check the image before when it comes to your own data.
Open your Linux terminal and cd to the BART directory.

From BART directory, type fsl to open the FSL GUI tool

Click FSLView and File to find the T1 image from anat directory - sub-01_T1w.nii.gz and functional image from func directory- sub-01_task-balloonanalogrisktask_run-01_bold.nii.gz

T1 anatomical image

Functional image
You might notice there is a black block on the face areas, it is because all the data from the open-source dataset need to be defaced for the purpose of privacy.
For more information about the clinical diagnosis of brain images, please go to here
Skull stripping
Since brain tissue is the focus of fMRI studies, our first step is to seperate the skull and non-brain areas from the brain tissue in the image. FSL provides this function with tool called bet that can help you achieve this goal.
Open FSL GUI from sub-01 directory and select the first tab BET brain extraction on the GUI list. A new window will appear. In the input image, click the file icon, select the sub-01
first, then anat and sub-01_T1w.nii.gz. The output image will be generated automatically.

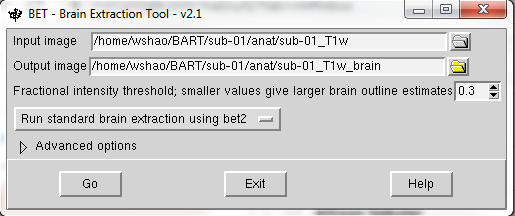
Adjust the stripping range
You might notice that there is a tab called Fractional intensity threshold…, as the description, you can adjust the number for the skull stripping range by changing the digit number. If too many brain tissues have been removed, you should set this to a smaller number, and vice versa if you think only a little skull has been removed.The default of FSL is 0.5.
Motion Correction
The concept is that when we take three-dimensional pictures of the brain, if the subject is moving, the images will look blurry; if the subject is still, the images will look more defined. In addition, if the subject moves a lot, we also risk measuring signals from a moving voxel. We are then in danger of measuring signal from the voxel for different parts of regions we have targeted beofre when the subject moves. In other words, motion can introduce confounds into the imaging data because motion generates signal. If the subject moves every time in response to a stimulus - for example, if he jerks his head every time he feels an electrical shock - then it can become impossible to determine whether the signal we are measuring is in response to the stimulus, or because of the movement.

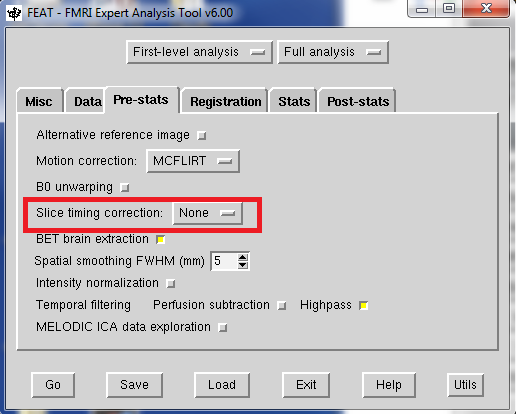
Open the FEAT GUI, motion correction is specified in the Pre-stats tab. FEAT’s default is to use FSL’s MCFLIRT tool, which you can see in the dropdown menu. You have the option to turn off motion correction, but unless you have a really good reason to do that, otherwise, leave it as it is.

Slice-Timing Correction
An fMRI volume is acquired in slices. Each of these slices takes time to acquire - from tens to hundreds of milliseconds.The two most common methods for creating volumes are sequential and interleaved slice acquisition. Sequential slice acquisition acquires each adjacent slice consecutively, interleaved slice acquisition acquires every other slice, and then fills in the gaps on the second pass.

figure created by Andrew Jahn
Later, when we use statistics models, we will assume that all of the slices were acquired simultaneously. To make this assumption valid, the time-series for each slice needs to be shifted back in time by the duration when it took to acquire that slice. FSL’s default is to not do slice-timing correction, and to include a temporal derivative instead because the 3 considerations:
1 It is best to not interpolate the data unless you have a good reason to do it.
2 Slice-timing correction doesn’t appear to lead to any significant gains in statistical power for short TRs - around 1 second or less.
3 There is an alternative solution for slice-timing correction problem, temporal derivative.
Smoothing
Although it sounds weird at the first time, people want to smooth the functional data, or replace the signal at each voxel with a weighted average of that voxel’s neighbors. Why would we want to make the images blurrier than they already are? It is true that smoothing does decrease the spatial resolution. but there are two benefits that outweight the disadvantages at leatst:
1 As fMRI data contains a lot of noise, and that the noise is frequently greater than the signal. By averaging over nearby voxels we can cancel out the noise and enhance the signal.
2 Smoothing data also can be useful when it comes to Normalization, which the goal is to normalize every subject’s brain for a standardized template brain.


The default of Smoothing in FSL is 5mm, again, unless you have a good reason, otherwise, you can skip this.
Registration and Normalization
As human beings, Most of us have very similar brains - everyone has 4 lobes, hippocampus or cerebellum. However, there are also differences in terms of brain size and shape. Therefore, if we want to do a group analysis, it is reasonable to ensure that each voxel for each brain in the subjects corresponds to the same part of the brain. If we are measuring a voxel in the hippocampus, we need to make sure that every subject’s hippocampus is in alignment with each other.
In order to do that, we need Registration and Normalization in FSL. Just as you would fit the material into the baking molds, each brain has to be transformed into the same size, shape, and dimensions. We do this by normalizing them to a template (standard space). A template is a standardized brain that has standard dimensions and coordinates, and most researchers have agreed to use them to report their results. So, if someone has a breakthrough finding, other researchers can check it accordingly.
We have both anatomical and functional images in our dataset. and our goal in here is to organize the functional images to the template so that we can do a group-level analysis across all of our subjects. It seems easy to just simply arrange the functional images directly to the template. However, it doesn’t work in reality. functional images are low-resolution, and therefore there are less likely to match up with the anatomical details of the template. In other words, start with the anatomical image is a better option. Warping the anatomical image can be very helpful for filling the functional images into the template becuase the anatomical and functional scans are typically acquired in the same session. As long as we have normalized the anatomical image to a template and recorded what kind of transformations were done, we can apply the same transformations to the functional images as well.
This alignment between the functional and anatomical images is called Registration. Most registration use the following steps:
1 Assume that the functional and anatomical images are in roughly the same location. If they are not, align the outlines of the images.
2 Take advantage of the fact that the anatomical and functional images have different contrast weightings - that is, areas where the image is dark on the anatomical image (such as cerebrospinal fluid) will appear bright on the functional image, and vice versa. This is called mutual information. The registration algorithm moves the images around to test different overlays of the anatomical and functional images, matching the bright voxels on one image with the dark voxels of another image, and the dark with the bright, until it finds a match that cannot be improved upon.
3 Once the best match has been found, then the same transformations that were used to warp the anatomical image to the template are applied to the functional images.

figure created by Andrew Jahn
In general:
anatomical image → template
functional image → anatomical image
functional image → template
Registration tab

In FSL, the registration includes all the functions you need. There two options you need to pay attention:
1 Main structural image,you need select the skullstripping anatomical image.
2 Standard spance
for the option 2, select the standard template that already installed in your FSL library, MNI152 would be the most common choice.
In the search window below, there are three options:
1 No search
2 Normal search
3 Full search
This signifies to FSL how much to search for a good initial alignment between the functional and anatomical image(for registration) and between the anatomical and template images (for normalization). The Full search option takes longer, but you will find that worth it becase this is more likely to produce better registration and normalization.
In the Degrees of Freedom window, which is the right tab after the search window, you can use 3, 6, or 12 degrees of freedom to transform the images. Registration has an additional option, BBR, which stands for Brain-Boundary Registration. This is a more advanced registration technique that uses the tissue boundaries to fine-tune the alignment between the functional and anatomical images. Similar to the Full search option above, it takes longer, but often gives a better alignment. For simplicity, we will use 12 degrees in this case.
Now, if you have loaded the data, and checked the Motion correction, Slice-Timing, and Smoothing tabs. Click Go and good to go. This could require a few minutes to process and a HTML
webpage will jump up and show you the resuts
Check the Preprocessed Data
When FSL finish data preprocessing, the next goal for us is to check the preprocessed data manually. For example, We are going to take a look at the registration and normalization and motion correction.
Registration and Normalization check
Click the Registration tab on the webpage, and scroll down. You will see a lot of “brains”.
Each brain includes the red outlines on the top of a greyscale brain from background. The first column, Summary Registration, shows representative functional images in the fMRI time-series (volume)
as the underlay, and the template brain as the red lines. If there were any problems in any of the previous registration or normalization steps, some obvious errors would be appear in here, such as the
image being skewed or largely outside of the red outline. As the red outlines approximately trace the outline of the greyscale image. you also need to check the alignments for internal structures such as
the ventricles. What’s more, Registration of example_func to highres, stands for registering functional image to anatomical image, Registration of highres to standard, indicated that FSL normalize
the anatomical image to the standard template. Make sure they are in a good shape as well.

Motion check
After the registration, you can click the Pre-stats link for the motion correction. Scroll down and you will see 3 plots indicated the motion across the time-series for that run, with volumes indexed on the x-axis, and the amount of motion (in millimeters) shown on the y-axis.

looking for any spikes in the motion plots that are greater than half of your voxel resolution (1 mm x 1mm x 1mm for structural MRI, 3 mm x 3 mm x 3 mm for fMRI in most circumstances), as well as drifts that are greater than the entire voxel size. If there is a relative motion of more than half a voxel or absolute motion of more than a voxel, you would be warned by FSL.
Summary
Now, Let’s review what we have done:
1 We have downloaded the BART data and the set up
2 We have inspect the anat and func data
3 we have preprocessed the data
Along the way our learning journey, one of the most difficult parts is that you have to do the trade-off. For example, if you stripping too many brain tissues, it will affect the later process like the registration and normalization as well as if you keep the brain skull. it is a judgemental call and you have to decide what is the best for your research. The more you think about and practice with FSL, the easier it will become make the decision quicker and more accurately.
Homework
Since we have done the preprocessing for one subject sub-01, please repeat all the procedures above for sub-02 and sub-03